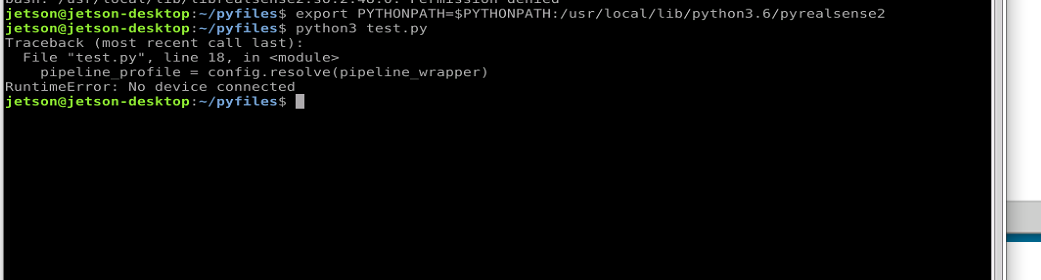
"No device connected" error with D415 connected to Jetson Nano
MartyG hi, I have installed the wrapper, and can "import pyrealsense2" with no error, but when I run the example test.py which contains the same code as opencv_viewer_example.py, nano cannot detect D415, but nano can detect an intel device is connetced.
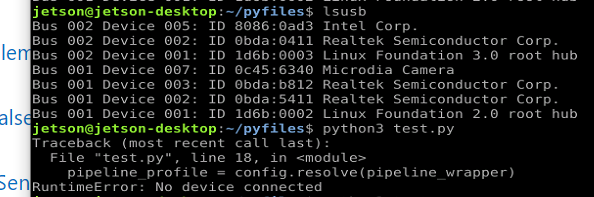
I have seen several discussion on "No device connected" error, but didn't find the solution. Is there any suggestion? I am looking forward to hearing from you。
-
The best starting point in investigating your case will be to refer you to the discussion in the link below.
https://github.com/IntelRealSense/librealsense/issues/7480#issuecomment-713498309
Please do ask further questions if your problem is not resolved by the advice in that discussion. Good luck!
-
Thank you for your help! The weather has gotten pretty cool in Chengdu China these days, how about your city?
I read https://github.com/IntelRealSense/librealsense/issues/7480#issuecomment-713498309 and found that the steps I followed is a combination of option1 and option2:
the steps I followed is :
- Ensure apt-get is up to date
sudo apt-get update && sudo apt-get upgrade
- Install Python and its development files via apt-get (Python 2 and 3 both work)
-
I skipped this step as the python 3.69 is already installed.
- Run the top level CMake command
mkdir buildcd build- cmake ../ -DFORCE_RSUSB_BACKEND=ON -DBUILD_PYTHON_BINDINGS:bool=true -DPYTHON_EXECUTABLE=/usr/bin/python3 -DCMAKE_BUILD_TYPE=release -DBUILD_EXAMPLES=true -DBUILD_GRAPHICAL_EXAMPLES=true -DBUILD_WITH_CUDA:bool=true
make -j4sudo make install
- update your PYTHONPATH environment variable to add the path to the pyrealsense library
-
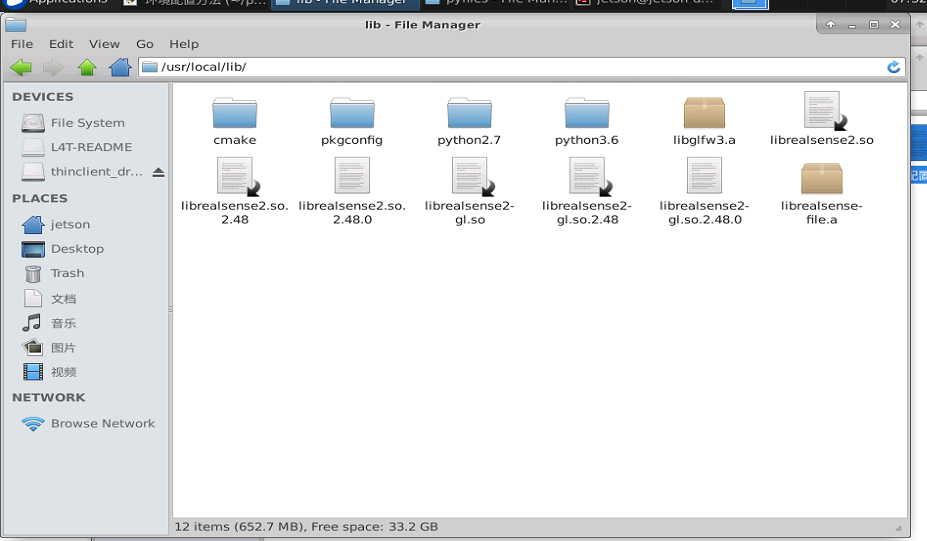
export PYTHONPATH=$PYTHONPATH:/usr/local/lib
The steps I followed is a little different from Option2(
librealsense/wrappers/python at master · IntelRealSense/librealsense · GitHub) , and the Bold words are the difference.
Following the steps above, I can import pyrealsense2, but when I run the example mentioned earlier, I got "No device connected".
shall I try Option 1? Or
librealsense/installation_jetson.md at master · IntelRealSense/librealsense · GitHub ?
What's embarrassing is that I don't quite understand the steps in librealsense/installation_jetson.md at master · IntelRealSense/librealsense · GitHub 囧
looking for hearing from you
-
It is a bit cold where I am too. :)
In case your PYTHONPATH variable that tells the Python wrapper how to find your Python 3 installation is not working correctly, let's try setting up an alternative method for doing so.
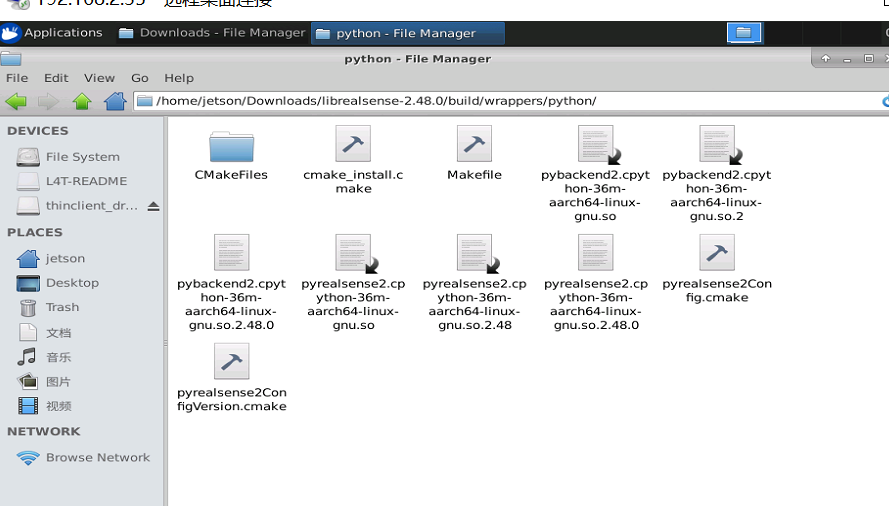
1. Navigate to the Python wrapper's build directory at the following folder location on your Jetson:
/librealsense/build/wrappers/python
2. Look for a pair of .so files named 'librealsense2.so' and 'pyrealsense2.so' in this folder. Remember that if you are using Python 3 then the 'pyrealsense2.so' file will have a long and complicated filename that is generated based on your Python version number. For example, a Python 3.5 user's file might be named pyrealsense2.cpython-35m-arm-linux-gnueabihf.so
The easiest way to locate the correct file is to look for a file in the folder that starts with 'pyrealsense2' and ends with '.so'
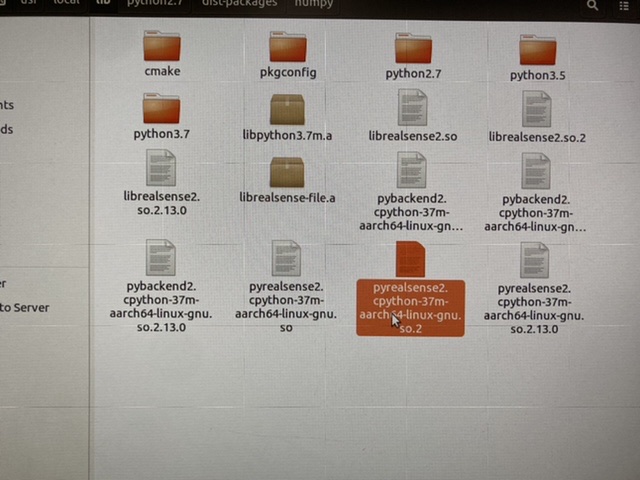
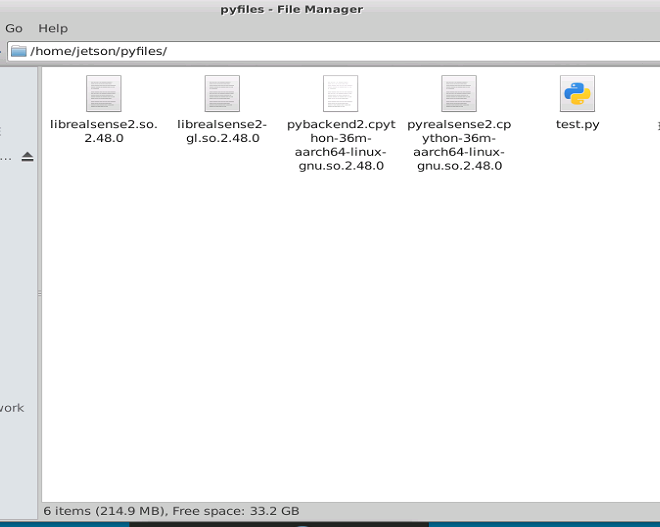
3. Once you have found 'librealsense2.so' and your complex-named 'pyrealsense2 ... so' file, copy these two files to the same folder that your test.py script is located in. Then whilst inside that project directory where your test.py script is located, run the script with python3 test.py
-
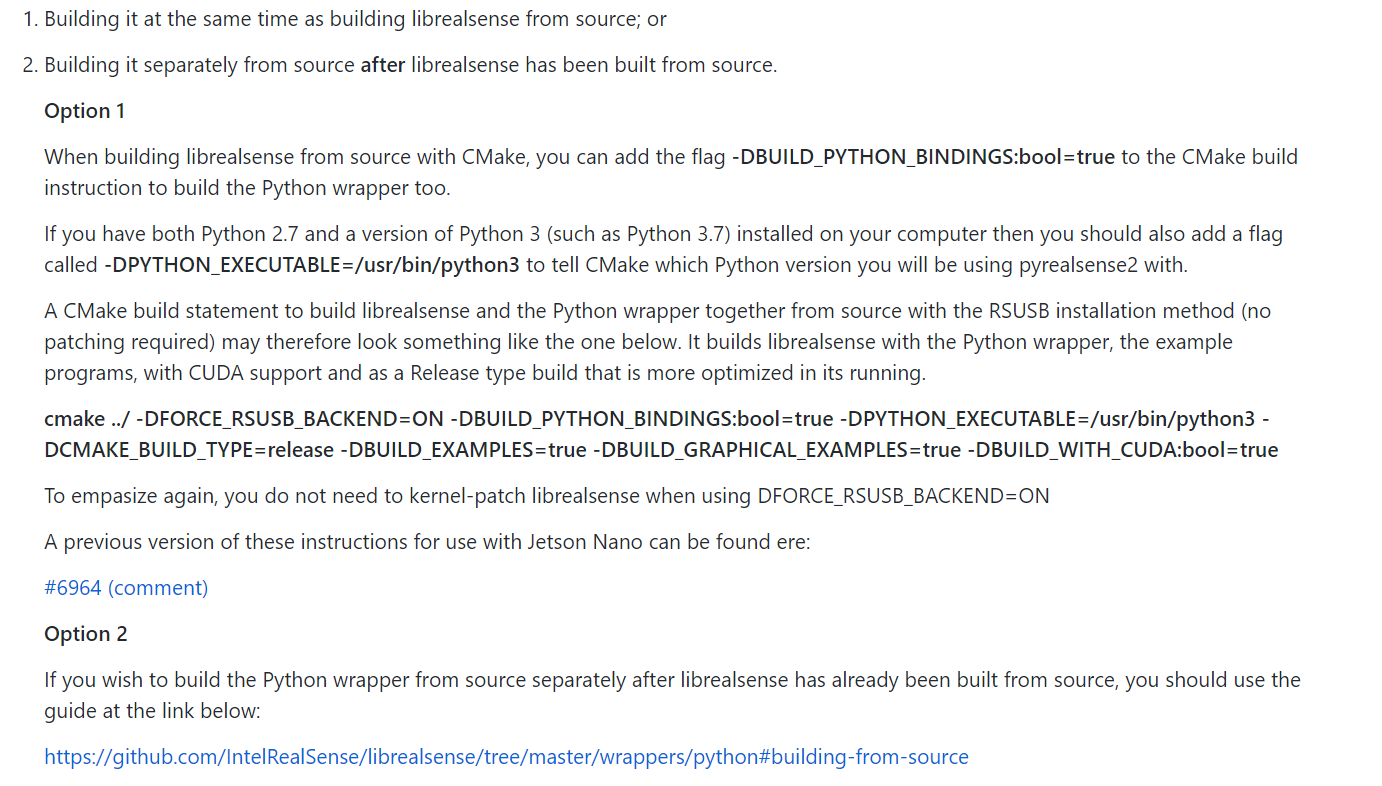
Let's put aside the .so files for now and see if we can improve on the installation process by going back to the beginning. I checked again through the mixed installation method that you used to see where it could be improved to give a better outcome and compared it to the installation instruction list for Nano in #6964
1. Firstly, we do not have to perform sudo apt-get update && sudo apt-get upgrade because we are installing from source code and that apt-get instruction (from the official Python wrapper instructions) was for the purpose of installing Python. As you mentioned, you
already have Python 3.69 installed.2. Next, the librealsense source code zip file should be extracted. You are then asked to perform mkdir build && cd build to create a
folder called 'build' and navigate to it. It is important that that the 'mkdir build && cd build' instruction is inputted whilst in the librealsense 'root directory' of the extracted source code folder. The correct location is the 'librealsense' folder with a list of files in it.
3. When you are in the 'build' folder after the 'cd build' command has taken you there, input the CMake build instruction, making sure that you have an internet connection (as this is required by -DFORCE_RSUSB_BACKEND)
cmake ../ -DFORCE_RSUSB_BACKEND=ON -DBUILD_PYTHON_BINDINGS:bool=true -DPYTHON_EXECUTABLE=/usr/bin/python3.6 -DCMAKE_BUILD_TYPE=release
-DBUILD_EXAMPLES=true -DBUILD_GRAPHICAL_EXAMPLES=true -DBUILD_WITH_CUDA:bool=true4. Whilst in the 'build' folder, input:
make -j4
sudo make install5. Open the bashrc file on your Nano by inputting the instruction nano ~/. bashrc into the Ubuntu terminal and add the lines below to the end of it.
export PATH=$PATH:~/.local/bin
export PYTHONPATH=$PYTHONPATH:/usr/local/lib
export PYTHONPATH=$PYTHONPATH:/usr/local/lib/python3.6/pyrealsense26. Source the bashrc file with the Ubuntu terminal instruction source .bashrc
7. Run your test.py script. If it still does not work, you may need to perform package restructuring using instructions in the link below.
https://github.com/IntelRealSense/meta-intel-realsense/issues/20#issuecomment-687180484
Please sign in to leave a comment.
Comments
5 comments