The instability of depth value and the correction method of depth error
Hello, may I ask the depth value I get when using D435i camera ranging is unstable and the error is large, how should I solve it? I pointed the camera at the wall to measure the distance, with time being the only variable. The depth value of a fixed point in the image is repeatedly refreshed through the python code to call the frame data of the depth image. But I found that when the camera is 0.2 to 0.3 meters away from the wall, the error change is only about 1 mm; However, when the distance is 1 meter or 1.5 meters, the error is almost 1 to 2 centimeters.
-
Hello, if the wall is plain with little or no texture on it, and especially if its color is white, then the camera will have difficulty analyzing it for depth information when placed at a distance from the wall. If your wall is plain then please ensure that the camera's infrared dot pattern projector is enabled as projecting the invisible pattern onto the wall will aid the camera in accurately measuring depth from a wall or similarly low-textured surfaces.
import pyrealsense2 as rs pipeline = rs.pipeline() config = rs.config() pipeline_profile = pipeline.start(config) device = pipeline_profile.get_device() depth_sensor = device.query_sensors()[0] if depth_sensor.supports(rs.option.emitter_enabled): depth_sensor.set_option(rs.option.emitter_enabled, 1) -
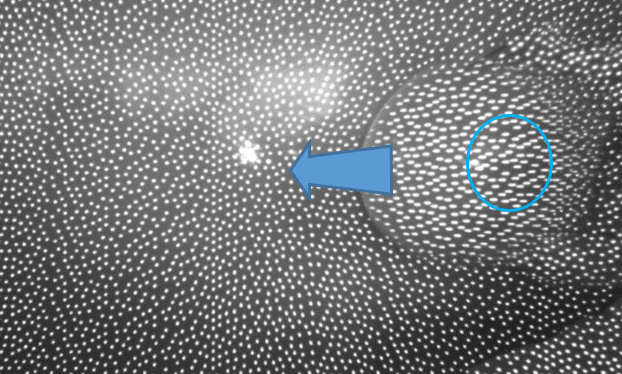
When the emitter is enabled, a built-in projector component in the camera casts a pattern of dots onto surfaces in front of it. This pattern is invisible to humans but can be seen by the camera. The camera uses these dots as a surface texture to aid it in measuring the surface's depth.
-
Performing a calibration can improve the depth image quality. In the case of walls, it can help to remove distortions on the image such as a flat wall being curved. It is more likely though that the camera is having difficulty finding texture on the wall to analyze when the camera is moved further away. Surfaces are also more difficult for the camera to read if they are colored dark gray or black.
If you have access to the RealSense Viewer tool then you could compare the depth measurements that it provides to the measurements in your Python application. If the Viewer's measurements are relatively correct then the issue may be in your Python code.
If you launch the Viewer and enter its 3D point cloud mode by clicking on the 3D option in the top corner of the Viewer window and then enable the Stereo Module, you can check the depth measurement by hovering the mouse cursor over a particular area of the image and looking at the values displayed on the text overlay that appears.
-
If post-processing filters are not applied to the depth image then it can result in a lower quality image than if filters are applied, yes. This principle can be demonstrated by enabling the depth image in the RealSense Viewer and then clicking on the blue icon beside 'Post Processing' to disable all of the post-processing filters simultaneously (as the Viewer applies a range of filters by default).
Program scripts do not enable any post-processing filters by default, and they have to be deliberately programmed into a script in order to apply them to the depth image produced by the script.
-
You can use either self-calibration or Dynamic Calibration. If you only need to calibrate depth and not also RGB then the On-Chip self calibration tool will be the easiest method as it can be accessed from the 'More' option in the RealSense Viewer's options side-panel without having to install additional software. A guide to self-calibration can be found at the link below.
https://dev.intelrealsense.com/docs/self-calibration-for-depth-cameras
Here is an example of Python code for setting up and applying post-processing filters.
https://github.com/IntelRealSense/librealsense/issues/1672#issuecomment-387438447
Please sign in to leave a comment.
Comments
14 comments